

Code Conventions
![]()

![]()
- Submitting Code
- Coding Style
- JavaDoc Style
- Logging Conventions
- Exceptions
- Code Health
- Unit Testing
First off, we thank you for your interest in the Alluxio open source project! We greatly appreciate any contribution; whether it be new features or bug fixes.
If you are a first time contributor to the Alluxio open source project, we strongly encourage you to follow the step-by-step instructions within the Contribution Guide and finish new contributor tasks before making more advanced changes to the Alluxio codebase.
Submitting Code
Submitting changes to Alluxio is done via pull requests. Please read our pull request guidelines for details on how to submit a pull request to the Alluxio repository. Below are some tips for the pull requests.
- We encourage you to break your work into small, single-purpose patches if possible. It is more difficult to merge in a large change with a lot of disjoint features.
- We track issues and features in our Github Issues. Open an issue detailing the proposed change or the bug description.
- Submit the patch as a GitHub pull request.
- If your pull request aims to solve an existing Github issue, please include a link to the Github
issue in the last line of the description field of the pull request,
such as
Fixes #1234. - Please read our pull request guidelines for details.
Coding Style
- Please follow the style of the existing codebase. We mainly follow the
Google Java style,
with the following deviations:
- Maximum line length of 100 characters.
- Third-party imports are grouped together to make IDE formatting much simpler.
- Class member variable names should be prefixed with
m- example:
private WorkerClient mWorkerClient;
- example:
- Static variable names should be prefixed with
s- example:
private static String sUnderFSAddress;
- example:
- Bash scripts follow the Google Shell style, and must be compatible with Bash 3.x
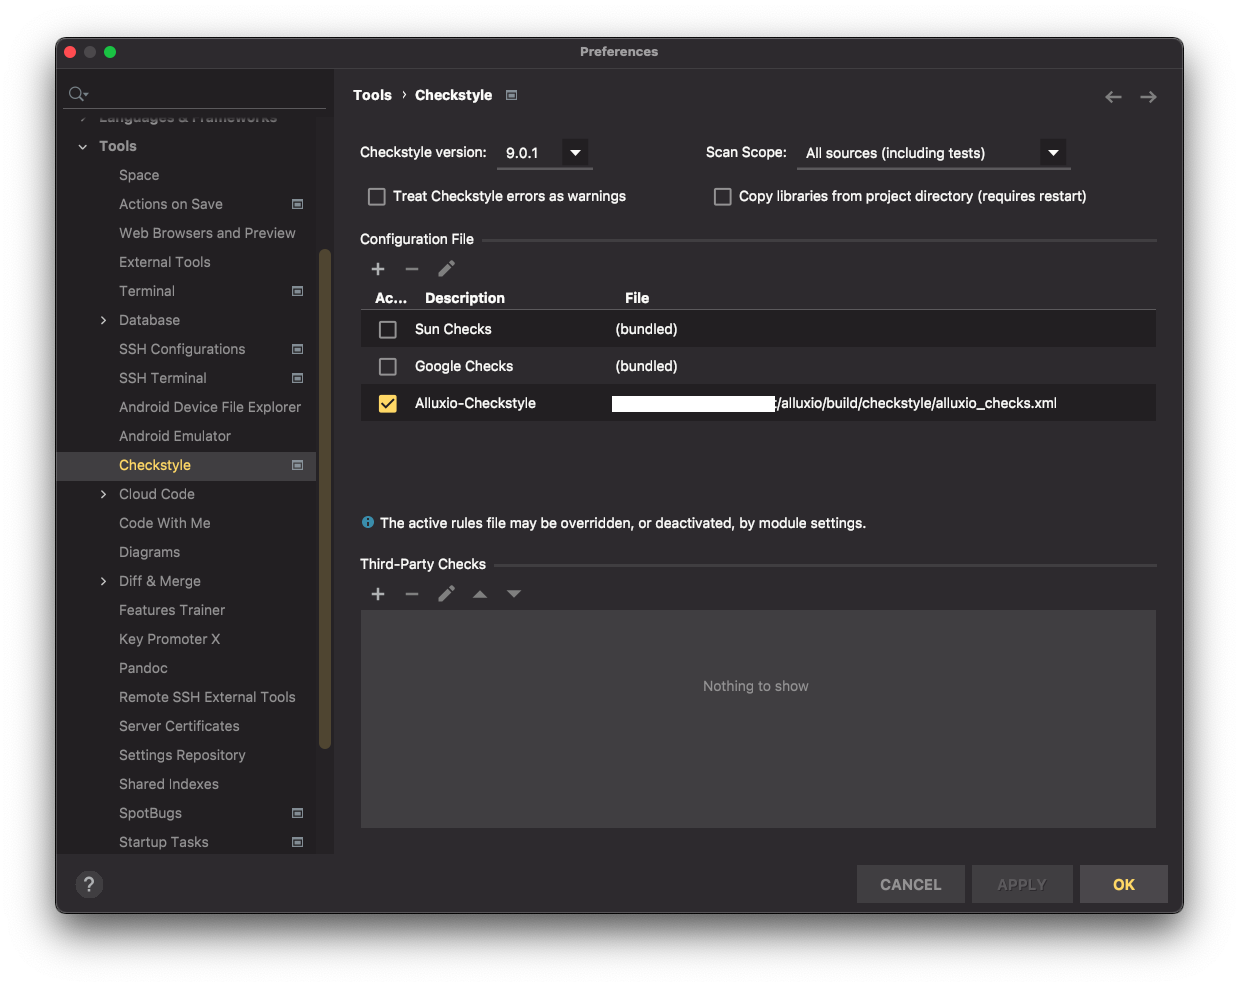
- If you use IntelliJ IDEA:
- You can use the IntelliJ checkstyle plugin and configure it as such under Preferences->Tools->Checkstyle.
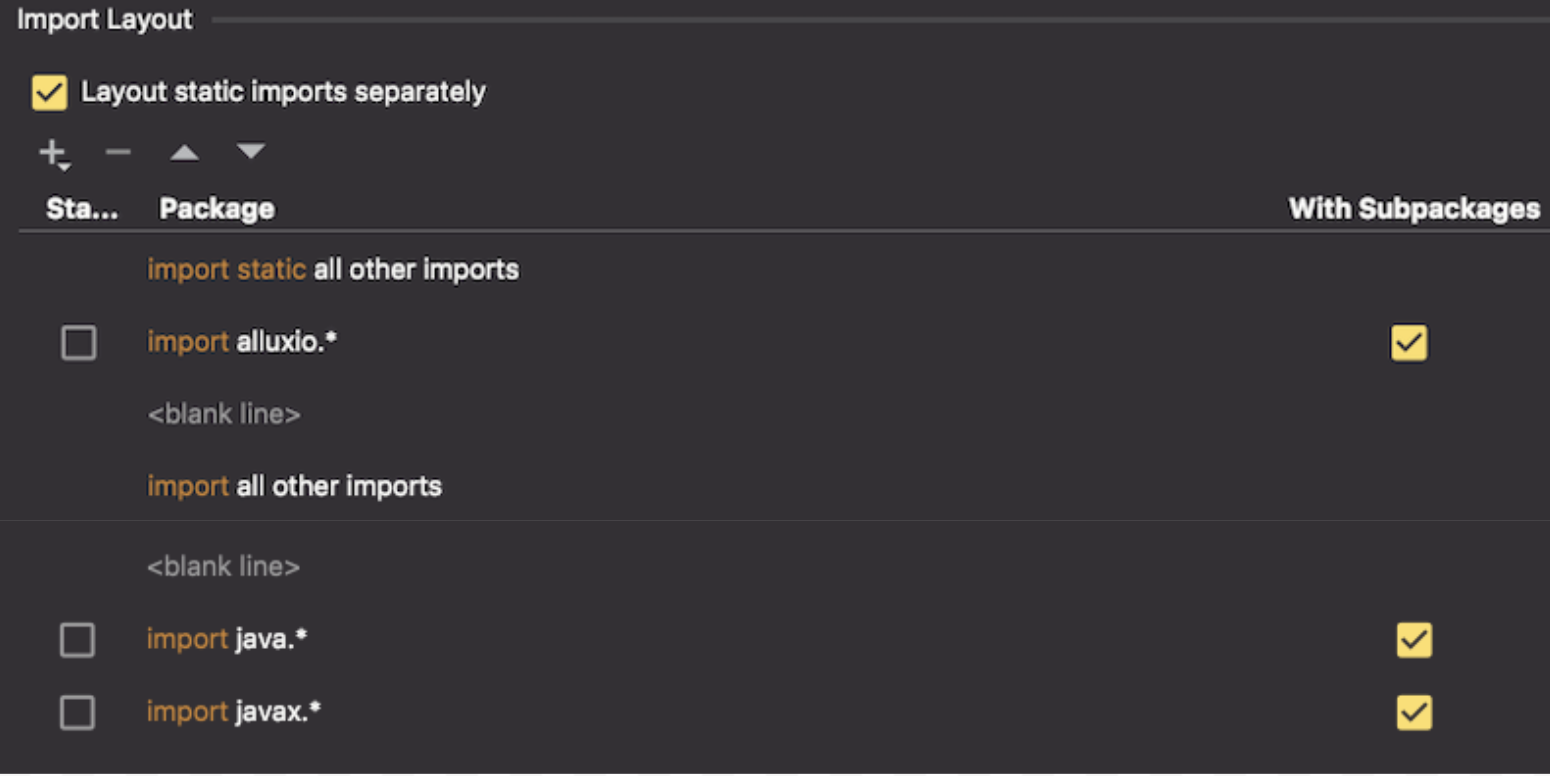
- To automatically format the import, configure in Preferences->Code Style->Java->Imports->Import Layout according to this order.
- In that same settings pane, you can set your style scheme to the one you imported in the Checkstyle plugin settings as such.
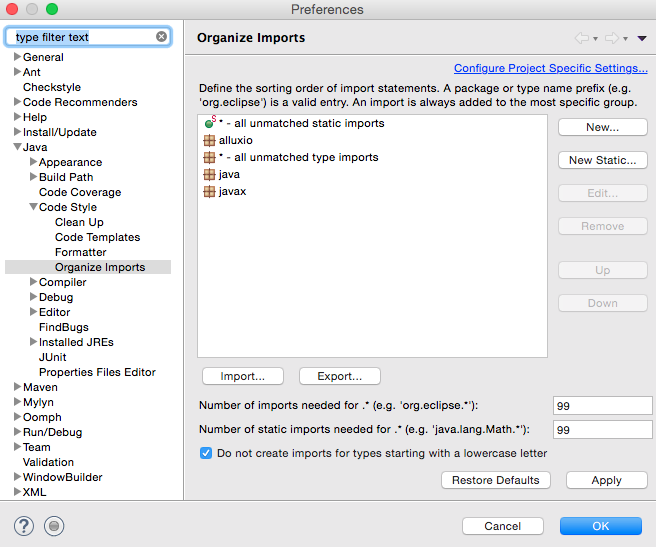
- If you use Eclipse:
- You can download our Eclipse formatter
- To organize your imports correctly, configure “Organize Imports” to look like this
-
To automatically reorder methods alphabetically, try the Rearranger Plugin, open Preferences, search for rearranger, remove the unnecessary comments, then right click, choose “Rearrange”, codes will be formatted to what you want
- To verify that the coding standards match, you should run checkstyle before sending a pull request to verify no new warnings are introduced:
$ mvn checkstyle:checkstyle
JavaDoc Style
This codebase follows the Oracle JavaDoc style with the following refinements:
-
All public classes/interfaces should have a class/interface-level comment that describes the purpose of the class/interface.
-
All public members should have a member-level comment the describes the purpose of the member.
/** The number of logical bytes used. */
public final AtomicLong mBytes = new AtomicLong(0);
- All public methods (including constructors) should use the following format.
/**
 * Does something. This is a method description that uses
 * 3rd person (does something) as opposed to 2nd person (do
 * something).
 *
 * @param param_1 description of 1st parameter
 * ...
 * @param param_n description of nth parameter
 * @return description of return argument (if applicable)
 * @throws exception_1 description of 1st exception case
 * ...
 * @throws exception_n description of nth exception case
 */
-
An exception to the above rule is that
@throwsdoesn’t need to be provided for@Testmethods, or for generic exceptions like IOException when there is nothing interesting to document. -
Only write exception javadoc when you think it will be useful to the developer using the method. There are so many sources of
IOExceptionthat it’s almost never useful to include javadoc for it. Do not write javadoc for unchecked exceptions likeRuntimeExceptionunless it is critical for this method. -
Getters and setters should omit the method description if it is redundant and only use
@paramand@returndescriptions.
/**
 * @return the number of pages stored
 */
long getPages();
- Most sentences should start with a capital letter and end with a period.
An exception to this style is an isolated sentence;
it does not start with a capital letter nor end with a period.
- GOOD (isolated): this is a short description
- GOOD (full sentence): This is a short description.
- GOOD (2 full sentences): This is a slightly longer description. It has two sentences.
- BAD: this is a short description.
- BAD: This is a short description
- BAD: this is a slightly longer description. It has two sentences
- When writing the description, the first sentence should be a concise summary of the class or method and the description should generally be implementation-independent. It is a good idea to use additional sentences to describe any significant performance implications.
/**
 * The default implementation of a metadata store for pages stored in cache.
 */
public class DefaultMetaStore implements MetaStore {
  ...
}
- When the
@deprecatedannotation is added, it should also at least tell the user when the API was deprecated and what to use as a replacement with@seeor@linktag.
/**
 * @deprecated as of Alluxio 2.1, replaced by
 *             {@link #newMethodName(int,int,int,int)}
 */
- When descriptions of
@param,@return,@throwexceed one line, the text should align with the first argument after the tag.
@throws FileAlreadyExistsException if there is already a file or directory at the given path
        in Alluxio Filesystem
- When reference a class name in javadoc, prefer
<code>ClassName</code>tags to{@link ClassName}.
Logging Conventions
Alluxio uses SLF4J for logging with typical usage pattern of:
import org.slf4j.Logger;
import org.slf4j.LoggerFactory;

public MyClass {
  private static final Logger LOG = LoggerFactory.getLogger(MyClass.class);

  public void someMethod() {
    LOG.info("Hello world");
  }
}
Note that, each class must use its own logger based on the class name,
like LoggerFactory.getLogger(MyClass.class) in above example,
so its output can easily be searched for.
The location of the output of SLF4J loggers can be found for
server logs
and application logs.
Best Practice
- When applicable, logging should be parameterized, to provide good performance and consistent
style.
// Recommended: Parameterized logging
LOG.debug("Client {} registered with {}", mClient, mHostname);
// Not recommended: Non-parameterized logging, hard to read and expensive due to String // concatenation regardless of if DEBUG is enabled LOG.debug("Client " + mClient + " registered with " + mHostname); - Error Messages Should Be Descriptive.
Error messages should include enough detail and context to determine the issue and potential
solution. This is important for quick diagnosis or fixes of errors.
// Recommended: error messages with context
LOG.error("Client {} failed to register to {}", mClient, mHostname, exception);
// Not recommended: There is no information on which client failed, or what the issue was LOG.error("Client failed to register"); - Log messages should be concise and readable.
Log messages should be written with readability in mind. Here are some tips for writing good log
messages.
- Log levels
INFOand above should be easily human readable - Log files should be concise and easy to read, noise reduces the value of logs
- Keep the amount of additional words to a minimum
- Clearly indicate if a variable reference is being printed by formatting the output as
variable: value - Ensure objects being logged have appropriate
toString()implementations
- Log levels
- Error level logs should have troubleshooting pointers if applicable
Which logging level to use
There are several levels of logging, see detailed explanation of different Levels Here are the guidelines for deciding which level to use.
Error Log Level
Error level logging (LOG.error) indicates system level problems which cannot be recovered from.
It should be accompanied by a stack trace of the exception thrown to help debug the issue.
// Recommended: a stack trace will be shown in the log
LOG.error("Failed to do something due to an exception", e);
// Not recommended: wrong logging syntax
LOG.error("Failed to do something due to an exception {}", e);
// Not recommended: stack trace will not be logged
LOG.error("Failed to do something due to an exception {}", e.toString());
When to Use
- An unrecoverable event has occurred. The thread will be terminated.
- Example: Failed to flush to the journal
- An unrecoverable event has occurred. The process will exit.
- Example: Master failed to bind to the RPC port
During Exception Handling
- Error level logging should include the exception and full stack trace
- The exception should only be logged once, at the boundary between the process and the external caller. For internal services (ie. periodic threads), the exception should be logged at the top level thread loop.
Warn Log Level
Warn level logging (LOG.warn) indicates a logical mismatch between user intended behavior
and Alluxio behavior.
Warn level logs are accompanied by an exception message using e.toString().
The associated stack trace is typically not included to avoid spamming the logs.
If needed, print the details in separate debug level logs.
// Recommended
LOG.warn("Failed to do something: {}", e.toString());
// Not recommended: wrong logging syntax
LOG.warn("Failed to do something: {}", e);
// Not recommended: this will print out the stack trace, can be noisy
LOG.warn("Failed to do something", e);
// Not recommended: the exception class name is not included
LOG.warn("Failed to do something {}", e.getMessage());
When to Use
- Unexpected state has been reached, but the thread can continue
- Example: Failed to delete the temporary file for buffering writes to S3
- User intended behavior cannot be achieved, but a default or fallback behavior is in place
- Example: EPOLL is specified but not available in the Netty library provided, default to NIO
- A misuse of configuration or API is suspected
- Example: Zookeeper address is specified but zookeeper is not enabled
During Exception Handling
- Warn level logging should be used for logical errors
- Only the exception message should be logged, as the stack trace is irrelevant, suppressed stack traces can be revealed at the debug level
- The warn level error message should be logged once, at the point where the process makes an explicit deviation from expected behavior
Info Log Level
Info level logging (LOG.info) records important system state changes. Exception messages
and stack traces are never associated with info level logs. Note that, this level of logging should
not be used on critical path of operations that may happen frequently to prevent negative performance
impact.
LOG.info("Master started with address: {}.", address);
When to Use
- Initialization of a long lived object within the process
- Example: Master RPC Server begins serving
- Important logical events in the process
- Example: A worker registers with the master
- End of life of a long lived object within the process
- Example: The Master RPC Server shuts down
During Exception Handling
- Info level logging is never involved with exceptions
Debug Log Level
Debug level logging (LOG.debug) includes detailed information for various aspects of
the Alluxio system. Control flow logging (Alluxio system enter and exit calls) is done in debug
level logs. Debug level logging of exceptions typically has the detailed information including
stack trace. Please avoid the slow strings construction on debug-level logging on critical path.
// Recommended
LOG.debug("Failed to connect to {} due to exception", mAddress, e);

// Recommended: string concatenation is only performed if debug is enabled
if (LOG.isDebugEnabled()) {
    LOG.debug("Failed to connect to address {} due to exception", host + ":" + port, e);
}
// Not recommended: string concatenation is always performed
LOG.debug("Failed to connect to {} due to exception", host + ":" + port, e);
When to Use
- Any exit or entry point of the process where execution is handed to an external process
- Example: A request is made to the under file system
During Exception Handling
- Debug level logs provide the control flow logging, in the case of an error exit, the exception message is logged
- For warn level messages which may not always be benign, the stack trace can be logged at the debug level. These debug level stack traces should eventually be phased out.
Trace Log Level
When to Use
- Any degree of detail within an experimental or new feature
During Exception Handling
- Up to the developer’s discretion
Exceptions
These are the guidelines for throwing and handling exceptions throughout the Alluxio codebase.
Throwing Exceptions
These are the guidelines for how and when to throw exceptions.
Use unchecked exceptions for events which indicate bugs
Examples: Illegal states, invalid API usage
public void method(String neverSupposedToBeNull) {
  Preconditions.checkNotNull(neverSupposedToBeNull, "neverSupposedToBeNull");
}
Use checked exceptions for everything else
Examples: File not found, interrupted exception, timeout exceeded
// Recommended: the checked exception should just be propagated
public void handleRawUserInput(String date) throws InvalidDateException {
  parseDate(date);
}

// Don't do this - it's reasonable for user input to be invalid.
public void handleRawUserInput(String date) throws InvalidDateException {
  try {
    parseDate(date);
  } catch (InvalidDateException e) {
    throw new RuntimeExcepiton("date " + date + " is invalid", e);
  }
}
Design code to minimize use of checked exceptions
Require callers to validate inputs so that invalid arguments can be unchecked exceptions.
Reuse existing exceptions when appropriate
Try to find an appropriate existing exception before inventing a new one.
Selectively javadoc exceptions
Only write exception javadoc when you think it will be useful to the developer using the method. There are so many sources of IOException that it’s almost never useful to include javadoc for it.
AlluxioStatusExceptions
On the wire we represent exceptions with one of 14 status codes, e.g. NOT_FOUND, UNAVAILABLE.
Within our server and client code, we represent these exceptions using exception classes
corresponding to these statuses, e.g. NotFoundException and UnavailableException.
AlluxioStatusException is the superclass for these Java exceptions.
Handling exceptions
These are the guidelines for how to handle exceptions.
Never swallow an unchecked exception
Either log the exception or propagate it.
It is usually wrong to both log and propagate. If every method did this, the same exception would be logged dozens of times, polluting the logs. The responsibility for logging lies with whatever method ends up handling the exception without propagating it.
Do not use Throwables.propagate()
See this explanation on why Throwables.propagate is deprecated.
Never Ignore InterruptedException
An InterruptedException means that another thread has signalled that this thread should die. There are
a few acceptable ways to handle an InterruptedException, listed in order of preference.
Actually stop the thread
class MyRunnable implements Runnable {
  public void run() {
    while (true) {
      try {
        doSomethingThatThrowsInterruptedException();
      } catch (InterruptedException e) {
        break;
      }
    }
  }
}
Directly propagate the exception
public void myMethod() throws InterruptedException {
  doSomethingThatThrowsInterruptedException();
}
Reset the interrupted flag and continue
This punts the problem forward. Hopefully later code will inspect the interrupted flag and handle it appropriately.
public void myMethod() {
  try {
    doSomethingThatThrowsInterruptedException();
  } catch (InterruptedException e) {
    Thread.currentThread().interrupt();
  }
}
Reset the interrupted flag and wrap the InterruptedException
public void myMethod() {
  try {
    doSomethingThatThrowsInterruptedException();
  } catch (InterruptedException e) {
    Thread.currentThread().interrupt();
    throw new RuntimeException(e);
  }
}
Always release resources, even in the event of an unchecked exception
Assume that any method might throw an unchecked exception and make sure this doesn’t cause resource
leaks. We do not stop servers when RPC threads throw RuntimeExceptions. try-finally and
try-with-resources blocks can make releasing resources much easier.
// with try-finally
Resource r = acquireResource();
try {
  doSomething(r);
} finally {
  r.close();
}

// with try-with-resources
try (Resource r = acquireResource()) {
  doSomething(r);
}
Be careful with exceptions thrown from finally blocks
If both the try block and the finally block throw exceptions, the exception from the try block will be lost and the finally block exception will be thrown. This is almost never desirable since the exception in the try block happened first. To avoid this, either make sure your finally blocks can’t throw exceptions, or use Guava’s Closer.
Using Guava’s Closer
Guava’s Closer is helpful for reducing boilerplate and making exception handling less error-prone, for releasing resources.
Closing multiple Closeables
Closer closer = new Closer();
closer.register(resource1);
closer.register(resource2);
closer.close();
If both calls to close() throw an exception, the first exception will be thrown and the second
exception will be added as a suppressed exception of the first one.
The Closer Idiom
From the Closer javadoc:
Closer closer = Closer.create();
try {
  InputStream in = closer.register(openInputStream());
  OutputStream out = closer.register(openOutputStream());
  // do stuff
} catch (Throwable e) {
  // ensure that any checked exception types other than IOException that could be thrown are
  // provided here, e.g. throw closer.rethrow(e,  CheckedException.class);
  throw closer.rethrow(e);
} finally {
  closer.close();
}
Closing resources only when an exception occurs
mCloser = new Closer();
mCloser.register(new resource1());
try {
  doSomething();
} catch (Throwable t) {
  // We want to close resources and throw the original exception t. Any exceptions thrown while
  // closing resources should be suppressed on t.
  try {
    throw mCloser.rethrow(t);
  } finally {
    mCloser.close();
  }
}
We have a util method for closing a closer and suppressing its exceptions onto an existing exception
mCloser = new Closer();
mCloser.register(new resource1());
try {
  doSomething();
} catch (Throwable t) {
  throw CommonUtils.closeAndRethrow(mCloser, t);
}
Code Health
Use the @Nullable annotation for all methods which may return null
This will improve static analysis of our code so that we can detect potential NullPointerExceptions
before they happen.
Use the javax.annotation.Nullable import.
import javax.annotation.Nullable;

@Nullable
public String getName() {
  if (mName == "") {
    return null;
  }
  return mName;
}
Use the @Nullable annotation for method parameters which are allowed to be null
When a method is specifically designed to be able to handle null parameters, those parameters
should be annotated with @Nullable.
Use the javax.annotation.Nullable import.
import javax.annotation.Nullable;

public repeat(@Nullable String s) {
  if (s == null) {
    System.out.println("Hello world");
  } else {
    System.out.println(s);
  }
}
Supply the variable name to Preconditions.checkNotNull
The preconditions check gives a more useful error message when you tell it the name of the variable being checked.
Preconditions.checkNotNull(blockInfo, "blockInfo") // Do this
Preconditions.checkNotNull(blockInfo); // Do NOT do this
Use static imports for standard test utilities
Tests are easier to read when there is less boilerplate. Use static imports for methods in
org.junit.Assert, org.junit.Assume, org.mockito.Matchers, and org.mockito.Mockito.
// Change
Assert.assertFalse(fileInfo.isFolder());
// to
assertFalse(fileInfo.isFolder());

// It may be necessary to add the import
import static org.junit.Assert.assertFalse;
Unit Testing
Unit Test Goals
- Unit tests act as examples of how to use the code under test.
- Unit tests detect when an object breaks its specification.
- Unit tests don’t break when an object is refactored but still meets the same specification.
How to Write a Unit Test
- If creating an instance of the class takes some work, create a
@Beforemethod to perform shared setup steps. The@Beforemethod gets run automatically before each unit test. Test-specific setup should be done locally in the tests that need it. In this example, we are testing aBlockMaster, which depends on a journal, clock, and executor service. The executor service and journal we provide are real implementations, and theTestClockis a fake clock which can be controlled by unit tests.
@Before
public void before() throws Exception {
  Journal blockJournal = new ReadWriteJournal(mTestFolder.newFolder().getAbsolutePath());
  mClock = new TestClock();
  mExecutorService =
  Executors.newFixedThreadPool(2, ThreadFactoryUtils.build("TestBlockMaster-%d", true));
  mMaster = new BlockMaster(blockJournal, mClock, mExecutorService);
  mMaster.start(true);
}
- If anything created in
@Beforecreates something which needs to be cleaned up (e.g. aBlockMaster), create an@Aftermethod to do the cleanup. This method is automatically called after each test.
@After
public void after() throws Exception {
  mMaster.stop();
}
-
Decide on an element of functionality to test. The functionality you decide to test should be part of the public API and should not care about implementation details. Tests should be focused on testing only one thing.
-
Give your test a name that describes what functionality it’s testing. The functionality being tested should ideally be simple enough to fit into a name, e.g.
removeNonexistentBlockThrowsException,mkdirCreatesDirectory, orcannotMkdirExistingFile.
@Test
  public void detectLostWorker() throws Exception {
- Set up the situation you want to test. Here we register a worker and then simulate an hour
passing. The
HeartbeatSchedulersection enforces that the lost worker heartbeat runs at least once.
// Register a worker.
long worker1 = mMaster.getWorkerId(NET_ADDRESS_1);
mMaster.workerRegister(worker1,
ImmutableList.of("MEM"),
ImmutableMap.of("MEM", 100L),
ImmutableMap.of("MEM", 10L),
NO_BLOCKS_ON_TIERS);

// Advance the block master's clock by an hour so that the worker appears lost.
mClock.setTimeMs(System.currentTimeMillis() + Constants.HOUR_MS);

// Run the lost worker detector.
HeartbeatScheduler.await(HeartbeatContext.MASTER_LOST_WORKER_DETECTION, 1, TimeUnit.SECONDS);
HeartbeatScheduler.schedule(HeartbeatContext.MASTER_LOST_WORKER_DETECTION);
HeartbeatScheduler.await(HeartbeatContext.MASTER_LOST_WORKER_DETECTION, 1, TimeUnit.SECONDS);
- Check that the class behaved correctly:
// Make sure the worker is detected as lost.
Set<WorkerInfo> info = mMaster.getLostWorkersInfo();
assertEquals(worker1, Iterables.getOnlyElement(info).getId());
}
- Repeat from step #3 until the class’s entire public API has been tested.
Conventions
- The tests for
src/main/java/ClassName.javashould go insrc/test/java/ClassNameTest.java - Tests do not need to handle or document specific checked exceptions. Prefer to simply add
throws Exceptionto the test method signature. - Aim to keep tests short and simple enough so that they don’t require comments to understand.
Patterns to avoid
- Avoid randomness. Edge cases should be handled explicitly.
- Avoid waiting for something by calling
Thread.sleep(). This leads to slower unit tests and can cause flaky failures if the sleep isn’t long enough. - Avoid using Whitebox to mess with the internal state of objects under test. If you need to mock a dependency, change the object to take the dependency as a parameter in its constructor (see dependency injection)
- Avoid slow tests. Mock expensive dependencies and aim to keep individual test times under 100ms.
Managing Global State
All tests in a module run in the same JVM, so it’s important to properly manage global state so
that tests don’t interfere with each other. Global state includes system properties, Alluxio
configuration, and any static fields. Our solution to managing global state is to use JUnit’s
support for @Rules.
Changing Alluxio configuration during tests
Some unit tests want to test Alluxio under different configurations. This requires modifying the
global Configuration object. When all tests in a suite need configuration parameters set a
certain way, use ConfigurationRule to set them.
@Rule
public ConfigurationRule mConfigurationRule = new ConfigurationRule(ImmutableMap.of(
    PropertyKey.key1, "value1",
    PropertyKey.key2, "value2"));
For configuration changes needed for an individual test, use ConfigurationRule#set(key, value) on the instance created by your test class. The resulting change of this method is only visible for the calling test.
@Rule
public ConfigurationRule mConfigurationRule = new ConfigurationRule(ImmutableMap.of(
    PropertyKey.key1, "value1",
    PropertyKey.key2, "value2"));

@Test
public void testSomething() {
  mConfigurationRule.set(PropertyKey.key1, "value3");
  // Now PropertyKey.key1 = "value3"
  ...
}

@Test
public void testAnotherThing() {
  // Now PropertyKey.key1 = "value1"
}
Changing System properties during tests
If you need to change a system property for the duration of a test suite, use SystemPropertyRule.
@Rule
public SystemPropertyRule mSystemPropertyRule = new SystemPropertyRule("propertyName", "value");
To set a system property during a specific test, use the SystemPropertyRule#toResource() method
to get a Closeable for a try-catch statement:
@Test
public void test() {
  try (Closeable p = new SystemPropertyRule("propertyKey", "propertyValue").toResource()) {
    // Test something with propertyKey set to propertyValue.
  }
}
Other global state
If a test needs to modify other types of global state, create a new @Rule for managing the
state so that it can be shared across tests.
One example of this is
TtlIntervalRule.
MacOS System Settings for Unit Tests
Sometimes you will need to play with a few system settings in order to have the unit tests pass
locally. A common setting that may need to be set is ulimit.
In order to increase the number of files and processes allowed on MacOS, run the following
$ sudo launchctl limit maxfiles 32768 32768
$ sudo launchctl limit maxproc 32768 32768
It is also recommended to exclude your local clone of Alluxio from Spotlight indexing. Otherwise,
your Mac may hang constantly trying to re-index the file system during the unit tests. To do this,
go to System Preferences > Spotlight > Privacy, click the + button, browse to the directory
containing your local clone of Alluxio, and click Choose to add it to the exclusions list.