
Burst Compute to Google Cloud Dataproc
![]()

This page details how to leverage a public cloud, such Google Cloud Platform (GCP), to scale analytic workloads directly on data residing on-premises without manually copying and synchronizing the data into the cloud. We will show you an example of what it might look like to run on-demand Presto and Hive with Alluxio in GCP connecting to an on-premise HDFS cluster. The same environment can also be used to run Spark or other Hadoop services with Alluxio.
- Set up two geographically dispersed GCP Dataproc clusters connected via Alluxio.
- Execute performance benchmarks.
Objectives
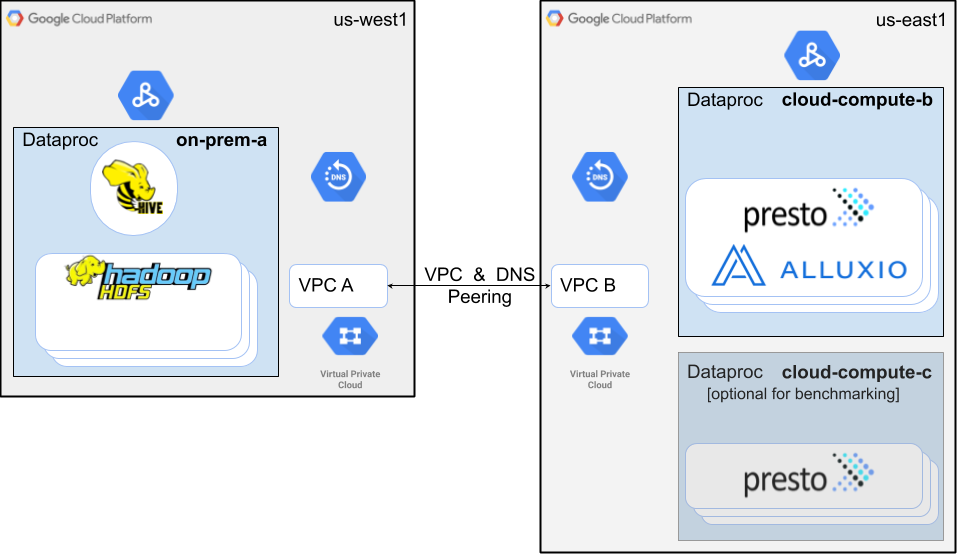
In this tutorial, you will create two Dataproc clusters, one proxying as a Hadoop deployment on-premises, and the other in a different region running Presto and Alluxio. Compute workloads will be bursted to the latter with data being serviced from the on-premise proxy via Alluxio.
Outline
- Create Dataproc clusters.
- Proxy for on-premise Hadoop with Hive and HDFS installed, named
on-prem-cluster. - Zero-Copy Burst cluster with Presto and Alluxio, named
cloud-compute-cluster.
- Proxy for on-premise Hadoop with Hive and HDFS installed, named
- Prepare data. This tutorial uses TPC-DS data, generated using this repository.
- Execute queries on the Presto CLI.
- Update data on-premises and see how changes are being seamlessly reflected in the public cloud via Alluxio.
Costs
This tutorial uses billable components of Google Cloud, including:
Use the Pricing Calculator to generate a cost estimate based on your usage.
Before you begin
The following are prerequisites to be able to execute this tutorial.
- Identify the project to use. Note: The project name must not contain a colon “:”.
- Enable the following APIs for your project: Cloud Shell API, Compute Engine API, Dataproc API and Cloud DNS API.
- Plan to run terraform commands with Cloud Shell.
- Check quotas for each region and any applicable global
quotas for compute resources.
By default this tutorial uses:
- 1 Dataproc
on-prem-clusterinus-west1.- 3 masters * n1-highmem-16 (16 vCPU & 104GB MEM)
- 5 workers * n1-highmem-16 (16 vCPU & 104GB MEM & 375GB local SSD)
- 1 Dataproc
cloud-compute-clusterinus-east1.- 1 master * n1-highmem-16 (16 vCPU & 104GB MEM)
- 5 workers * n1-highmem-16 (16 vCPU & 104GB MEM & 375GB local SSD)
- 1 Dataproc
Launching Clusters using Terraform
For this tutorial, you will use Terraform to execute the following:
- Network. Create two VPCs in different regions, and enable Cloud VPC and DNS peering to connect them.
- Dataproc. Spin up two Dataproc clusters.
- Prepare Data. Mount TPC-DS dataset in the on-premise proxy cluster to be accessed by the
compute cluster
cloud-compute-cluster.
Create clusters by running the commands shown with Cloud Shell:
- Download the terraform file.
$ wget https://alluxio-public.storage.googleapis.com/enterprise-terraform/stable/gcp_hybrid_apache_simple.tar.gz $ tar -zxf gcp_hybrid_apache_simple.tar.gz $ cd gcp_hybrid_apache_simple - Initialize the Terraform working directory to download the necessary plugins to execute.
You only need to run this once for the working directory.
$ terraform init - Create the networking resources and launch the two Dataproc clusters.
Cloud Shell will preconfigured your terminal with Google Cloud Platform project and credentials,
so no additional variables are needed. After running the whole GCP tutorial, you can play with the
variables defined in
variables.tfand relaunch the clusters with new configuration.$ terraform apply- Type yes to confirm resource creation.
- Keep the terminal to destroy resources once done with the tutorial.
Note: Some resources, like the VPC, requires the name to be unique in the project. If you are running into name collision with the default terraform setup, you can set a prefix to the resources by updating variable
custom_nameinvariables.tf.
What’s Next
Now that Terraform is done launching the clusters, you will copy a dataset into the on-premise Hadoop cluster and run queries from the Presto compute cluster.
Here’s a summary of what’s to come:
- Load the TPC-DS dataset into HDFS and create table definitions in Hive on the on-premise proxy
cluster, named
on-prem-cluster. - Run queries from the zero-copy burst cluster, named
cloud-compute-cluster, to measure execution performance with Alluxio.- Running the query for the first time will access HDFS in the
on-prem-clustercluster. - Running the query for the second time will access data from Alluxio, since the data is being cached from the first run, resulting in a faster query.
- Running the query for the first time will access HDFS in the
Changes to the cluster on-premises, such as updating tables in Hive, will seamlessly propagate to Alluxio without any user intervention. After executing the benchmarks, you will also learn about Alluxio’s metadata synchronization capabilities.
Prepare data
SSH into one of the master instances of the Hadoop cluster on-prem-cluster to prepare TPC-DS data for query execution.
Execute the following in a new Cloud Shell terminal.
You may need to generate an SSH key pair.
$ gcloud compute ssh --zone "us-west1-a" "on-prem-cluster-m-0"
Once you’ve logged into the cluster, copy data from Alluxio’s public GCS bucket.
on-prem-cluster-m-0$ location="gs://alluxio-public-west/spark/unpart_sf100_10k"
on-prem-cluster-m-0$ hdfs dfs -mkdir /tmp/tpcds/
on-prem-cluster-m-0$ hadoop distcp ${location}/store_sales/ hdfs:///tmp/tpcds/
on-prem-cluster-m-0$ hadoop distcp ${location}/item/ hdfs:///tmp/tpcds/
This step takes about 4 minutes with the default configuration.
Once data is copied into HDFS, create the table metadata in Hive.
Dataproc sets the HDFS nameservice using the value of Dataproc cluster name in high availability mode.
Replace the hdfs_host_info to the actual nameservice to point to the HDFS cluster inside on-prem-cluster.
on-prem-cluster-m-0$ wget https://alluxio-public.storage.googleapis.com/hybrid-apache-simple/stable/create-table
on-prem-cluster-m-0$ sed -i "s/hdfs_host_info/on-prem-cluster/g" create-table
on-prem-cluster-m-0$ hive -f create-table
Keep the SSH session open as you will re-use the same session later.
Run Applications
You may choose to run different applications on Google Dataproc to leverage Alluxio. To continue to benchmark with TPC-DS data, Presto has been pre-configured in your setup.
Cleaning up
When done, on the same Cloud Shell terminal used to create, run terraform destroy to tear down the
previously created GCP resources.
Type yes to approve.
Congratulations, you’re done!
If you want to explore more, take a look at customizable data policies in Alluxio to migrate your
data from the environment on-premises to Cloud Storage.
Define policies based on date created, updated, or accessed and move or migrate data across storage
systems, such as HDFS and GCS, online without any interruption to your workloads.
An example policy would look like: move HDFS path hdfs://on_prem_hdfs/user_a/mydir to the GCS path
gs://mybucket/mydir once the create time in HDFS is older than two days.