

Quick Start Guide
![]()

![]()
- Prerequisites
- Downloading Alluxio
- Configuring Alluxio
- Validating Alluxio environment
- Starting Alluxio
- Using the Alluxio Shell
- [Bonus] Mounting in Alluxio
- [Bonus] Accelerating Data Access with Alluxio
- Stopping Alluxio
- Conclusion
- Next Steps
- FAQ
This quick start guide goes over how to run Alluxio on a local machine. The guide will cover the following tasks:
- Download and configure Alluxio
- Validate the Alluxio environment
- Start Alluxio locally
- Perform basic tasks via Alluxio Shell
- [Bonus] Mount a public Amazon S3 bucket in Alluxio
- Stop Alluxio
[Bonus] This guide contains optional tasks that uses credentials from an AWS account with an access key id and secret access key. The optional sections will be labeled with [Bonus].
Note This guide is designed to start an Alluxio system with minimal setup on a single machine. If you are trying to speedup SQL analytics, you can try the Presto Alluxio Getting Started tutorial.
Prerequisites
- MacOS or Linux
- Java 8
- Enable remote login: see instructions for MacOS users
- [Bonus] AWS account and keys
Downloading Alluxio
Download Alluxio from this page. Select the desired release followed by the distribution built for default Hadoop. Unpack the downloaded file with the following commands.
$ tar -xzf alluxio-2.7.4-bin.tar.gz
$ cd alluxio-2.7.4
This creates a directory alluxio-2.7.4 with all of the Alluxio
source files and Java binaries. Through this tutorial, the path of this directory will be referred
to as ${ALLUXIO_HOME}.
Configuring Alluxio
In the ${ALLUXIO_HOME}/conf directory, create the conf/alluxio-site.properties configuration
file by copying the template file.
$ cp conf/alluxio-site.properties.template conf/alluxio-site.properties
Set alluxio.master.hostname in conf/alluxio-site.properties to localhost.
$ echo "alluxio.master.hostname=localhost" >> conf/alluxio-site.properties
[Bonus] Configuration for AWS
To configure Alluxio to interact with Amazon S3, add AWS access information to the Alluxio
configuration in conf/alluxio-site.properties. The following commands update the
configuration.
$ echo "s3a.accessKeyId=<AWS_ACCESS_KEY_ID>" >> conf/alluxio-site.properties
$ echo "s3a.secretKey=<AWS_SECRET_ACCESS_KEY>" >> conf/alluxio-site.properties
Replace <AWS_ACCESS_KEY_ID> and <AWS_SECRET_ACCESS_KEY> with
a valid AWS access key ID and AWS secret access key respectively.
Validating Alluxio environment
Alluxio provides commands to ensure the system environment is ready for running Alluxio services. Run the following command to validate the environment for running Alluxio locally:
$ ./bin/alluxio validateEnv local
This reports potential problems that might prevent Alluxio from starting locally.
Check out this page for detailed
usage information regarding the validateEnv command.
Starting Alluxio
Alluxio needs to be formatted before starting the process. The following command formats the Alluxio journal and worker storage directories.
$ ./bin/alluxio format
Note that if this command returns failures related to ‘ValidateHdfsVersion’, and you are not planning to integrate HDFS to alluxio yet, you can ignore this failure for now. By default, Alluxio is configured to start a master and worker process when running locally. Start Alluxio on localhost with the following command:
$ ./bin/alluxio-start.sh local SudoMount
Congratulations! Alluxio is now up and running! Visit http://localhost:19999 and http://localhost:30000 to see the status of the Alluxio master and worker respectively.
Using the Alluxio Shell
The Alluxio shell provides command line operations for interacting with Alluxio. To see a list of filesystem operations, run
$ ./bin/alluxio fs
List files in Alluxio with the ls command. To list all files in the root directory, use the
following command:
$ ./bin/alluxio fs ls /
At this moment, there are no files in Alluxio. Copy a file into Alluxio by using the
copyFromLocal shell command.
$ ./bin/alluxio fs copyFromLocal ${ALLUXIO_HOME}/LICENSE /LICENSE
Copied file://${ALLUXIO_HOME}/LICENSE to /LICENSE
List the files in Alluxio again to see the LICENSE file.
$ ./bin/alluxio fs ls /
-rw-r--r-- staff  staff     27040       PERSISTED 02-17-2021 16:21:11:061 100% /LICENSE
The output shows the file that exists in Alluxio. Each line contains the owner and group of the file, the size of the file, whether it has been persisted to its under file storage (UFS), the date it was created, and the percentage of the file that is cached in Alluxio.
The cat command prints the contents of the file.
$ ./bin/alluxio fs cat /LICENSE
                                 Apache License
                           Version 2.0, January 2004
                        http://www.apache.org/licenses/

   TERMS AND CONDITIONS FOR USE, REPRODUCTION, AND DISTRIBUTION
...
With the default configuration, Alluxio uses the local file system as its UFS and automatically
persists data to it. The default path for the UFS is ${ALLUXIO_HOME}/underFSStorage. Examine the contents of the UFS with:
$ ls ${ALLUXIO_HOME}/underFSStorage
LICENSE
The LICENSE file also appears in the Alluxio file system through the master’s web UI. Here, the Persistence State column shows the file as PERSISTED.
View the amount of memory currently consumed by data in Alluxio under the Storage Usage Summary on the main page of the master’s web UI, or through the following command.
$ ./bin/alluxio fs getUsedBytes
Used Bytes: 27040
This memory can be reclaimed by freeing it from Alluxio. Notice this does not remove it from the Alluxio filesystem nor the UFS. Rather it is just removed from the cache in Alluxio.
$ ./bin/alluxio fs free /LICENSE
/LICENSE was successfully freed from Alluxio space.

$ ./bin/alluxio fs getUsedBytes
Used Bytes: 0

$ ./bin/alluxio fs ls /
-rw-r--r-- staff  staff     27040       PERSISTED 02-17-2021 16:21:11:061 0% /LICENSE

$ ls ${ALLUXIO_HOME}/underFSStorage/
LICENSE
Accessing the data will fetch the file from the UFS and bring it back into the cache in Alluxio.
$ ./bin/alluxio fs copyToLocal /LICENSE ~/LICENSE.bak
Copied /LICENSE to file:///home/staff/LICENSE.bak

$ ./bin/alluxio fs getUsedBytes
Used Bytes: 27040

$ ./bin/alluxio fs ls /
-rw-r--r-- staff  staff     27040       PERSISTED 02-17-2021 16:21:11:061 100% /LICENSE

$ rm ~/LICENSE.bak
[Bonus] Mounting in Alluxio
Alluxio unifies access to storage systems with the unified namespace feature. Read the Unified Namespace blog post and the unified namespace documentation for more detailed explanations of the feature.
This feature allows users to mount different storage systems into the Alluxio namespace and access the files across various storage systems through the Alluxio namespace seamlessly.
Create a directory in Alluxio to store our mount points.
$ ./bin/alluxio fs mkdir /mnt
Successfully created directory /mnt
Mount an existing S3 bucket to Alluxio. This guide uses the alluxio-quick-start S3 bucket.
$ ./bin/alluxio fs mount --readonly alluxio://localhost:19998/mnt/s3 s3://alluxio-quick-start/data
Mounted s3://alluxio-quick-start/data at alluxio://localhost:19998/mnt/s3
List the files mounted from S3 through the Alluxio namespace by using the ls command.
$ ./bin/alluxio fs ls /mnt/s3
-r-x------ staff  staff    955610 PERSISTED 01-09-2018 16:35:00:882   0% /mnt/s3/sample_tweets_1m.csv
-r-x------ staff  staff  10077271 PERSISTED 01-09-2018 16:35:00:910   0% /mnt/s3/sample_tweets_10m.csv
-r-x------ staff  staff     89964 PERSISTED 01-09-2018 16:35:00:972   0% /mnt/s3/sample_tweets_100k.csv
-r-x------ staff  staff 157046046 PERSISTED 01-09-2018 16:35:01:002   0% /mnt/s3/sample_tweets_150m.csv
The newly mounted files and directories are also visible in the Alluxio web UI.
With Alluxio’s unified namespace, users can interact with data from different storage systems
seamlessly. The ls -R command recursively lists all the files that exist under a directory.
$ ./bin/alluxio fs ls -R /
-rw-r--r-- staff  staff     26847 PERSISTED 01-09-2018 15:24:37:088 100% /LICENSE
drwxr-xr-x staff  staff         1 PERSISTED 01-09-2018 16:05:59:547  DIR /mnt
dr-x------ staff  staff         4 PERSISTED 01-09-2018 16:34:55:362  DIR /mnt/s3
-r-x------ staff  staff    955610 PERSISTED 01-09-2018 16:35:00:882   0% /mnt/s3/sample_tweets_1m.csv
-r-x------ staff  staff  10077271 PERSISTED 01-09-2018 16:35:00:910   0% /mnt/s3/sample_tweets_10m.csv
-r-x------ staff  staff     89964 PERSISTED 01-09-2018 16:35:00:972   0% /mnt/s3/sample_tweets_100k.csv
-r-x------ staff  staff 157046046 PERSISTED 01-09-2018 16:35:01:002   0% /mnt/s3/sample_tweets_150m.csv
This shows all the files across all of the mounted storage
systems. The /LICENSE file is from the local file system whereas the files under /mnt/s3/ are
in S3.
[Bonus] Accelerating Data Access with Alluxio
Since Alluxio leverages memory to store data, it can accelerate access to data. Check the status of a file previously mounted from S3 into Alluxio:
$ ./bin/alluxio fs ls /mnt/s3/sample_tweets_150m.csv
-r-x------ staff  staff 157046046 PERSISTED 01-09-2018 16:35:01:002   0% /mnt/s3/sample_tweets_150m.csv
The 0% in the output shows that the file is Not In Memory. This file is a sample of tweets.
Count the number of tweets with the word “kitten” and time the duration of the operation.
$ time ./bin/alluxio fs cat /mnt/s3/sample_tweets_150m.csv | grep -c kitten
889

real	0m22.857s
user	0m7.557s
sys	0m1.181s
Depending on your network connection, the operation may take over 20 seconds. If reading this file takes too long, use a smaller dataset. The other files in the directory are smaller subsets of this file. Alluxio can accelerate access to this data by using memory to store the data.
After reading the file by the cat command, check the status with the ls command:
$ ./bin/alluxio fs ls /mnt/s3/sample_tweets_150m.csv
-r-x------ staff  staff 157046046 PERSISTED 01-09-2018 16:35:01:002 100% /mnt/s3/sample_tweets_150m.csv
100% in the output shows that the file is now fully loaded to Alluxio, so reading the file
from now on should be significantly faster.
Now count the number of tweets with the word “puppy”.
$ time ./bin/alluxio fs cat /mnt/s3/sample_tweets_150m.csv | grep -c puppy
1553

real	0m1.917s
user	0m2.306s
sys	0m0.243s
Subsequent reads of the same file are noticeably faster since the data is stored in Alluxio memory.
Now count how many tweets mention the word “bunny”.
$ time ./bin/alluxio fs cat /mnt/s3/sample_tweets_150m.csv | grep -c bunny
907

real	0m1.983s
user	0m2.362s
sys	0m0.240s
Congratulations! You installed Alluxio locally and used Alluxio to accelerate access to data!
Stopping Alluxio
Stop Alluxio with the following command:
$ ./bin/alluxio-stop.sh local
Conclusion
Congratulations on completing the quick start guide for Alluxio! This guide covered how to download and install Alluxio locally with examples of basic interactions via the Alluxio shell. This was a simple example on how to get started with Alluxio.
There are several next steps available. Learn more about the various features of Alluxio in our documentation. The resources below detail deploying Alluxio in various ways, mounting existing storage systems, and configuring existing applications to interact with Alluxio.
Next Steps
Deploying Alluxio
Alluxio can be deployed in many different environments.
Under Storage Systems
Various under storage systems can be accessed through Alluxio.
- Alluxio with Azure Blob Store
- Alluxio with S3
- Alluxio with GCS
- Alluxio with Minio
- Alluxio with CephFS
- Alluxio with CephObjectStorage
- Alluxio with Swift
- Alluxio with GlusterFS
- Alluxio with HDFS
- Alluxio with OSS
- Alluxio with NFS
Frameworks and Applications
Different frameworks and applications work with Alluxio.
- Apache Spark with Alluxio
- Apache Hadoop MapReduce with Alluxio
- Apache HBase with Alluxio
- Apache Hive with Alluxio
- Presto with Alluxio
FAQ
Why do I keep getting “Operation not permitted” for ssh and alluxio?
For the users who are using macOS 11(Big Sur) or later, when running the command
$ ./bin/alluxio format
you might get the error message:
alluxio-2.7.4/bin/alluxio: Operation not permitted
This can be caused by the newly added setting options to macOS.
To fix it, open System Preferences and open Sharing.
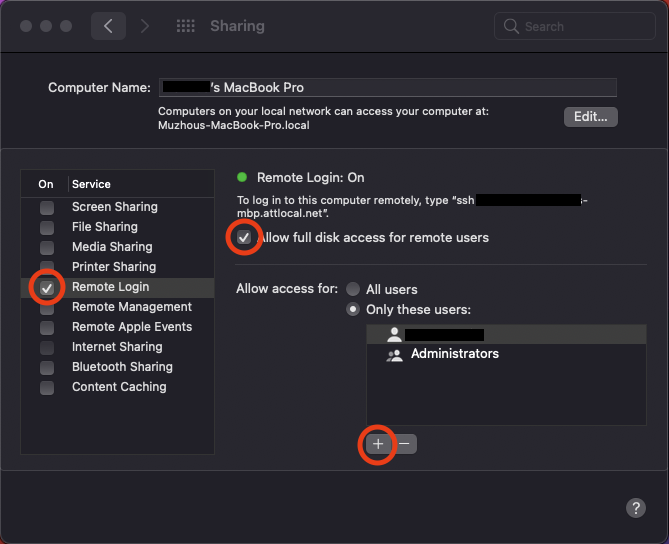
On the left, check the box next to Remote Login. If there is Allow full access to remote users as shown in the
image, check the box next to it. Besides, click the + button and add yourself to the list of users that are allowed
for Remote Login if you are not already in it.