
Burst Compute to AWS EMR
![]()

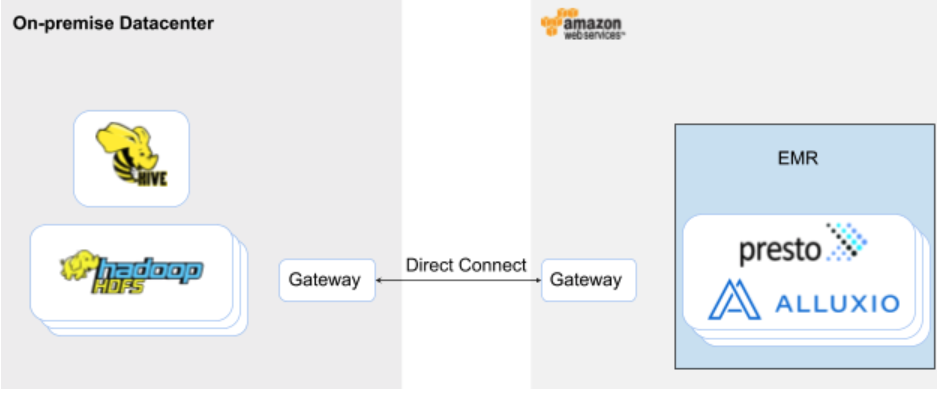
This guide walks you through the setup for leveraging compute on Amazon Web Services (AWS) to scale workloads directly on data residing on-premises without manually copying and synchronizing the data into cloud storage. We provide a reference deployment for what it might look like to run on-demand Presto and Hive with Alluxio in AWS connecting to an on-premise HDFS cluster. The same environment can also be used to run Spark or other Hadoop services with Alluxio.
- Set up two geographically dispersed AWS EMR clusters connected via Alluxio.
- Execute performance benchmarks.
This document is useful if you are planning to evaluate the hybrid cloud solution with Alluxio. The examples included connect an EMR cluster with Alluxio to another cluster in AWS itself acting as a proxy for the environment on-premises.
- Objectives
- Costs
- Before you begin
- Launching Clusters using Terraform
- Access the Clusters
- Prepare Data
- Run Applications
- Cleaning up
Objectives
In this tutorial, you will create two EMR clusters, one proxying as a Hadoop deployment on-premises, and the other in a different region running Presto and Alluxio. Compute workloads will be bursted to the latter with data being serviced from the on-premise proxy via Alluxio.
- Create EMR clusters.
- Proxy for on-premise Hadoop with Hive and HDFS installed, named
on-prem-cluster. - Zero-Copy Burst cluster with Presto and Alluxio, named
alluxio-compute-cluster.
- Proxy for on-premise Hadoop with Hive and HDFS installed, named
- Prepare data. This tutorial uses TPC-DS data, generated using this repository.
- Execute queries on the Presto CLI.
- Update data on-premises and see how changes are being seamlessly reflected in the public cloud via Alluxio.
Costs
This tutorial uses billable components of Amazon Web Service, including:
Use the Pricing Calculator to generate a cost estimate based on your usage.
Before you begin
The following are prerequisites to be able to execute this tutorial.
- Terraform CLI has been installed (version should be 0.12 or newer). Follow the Terraform quickstart guide.
- AWS CLI has been installed. Follow the AWS CLI install guide
- AWS account with default EMR roles.
Run
aws emr create-default-rolesif default EMR roles don’t exist. - AWS credentials for creating resources. Refer to AWS CLI credentials config.
By default this tutorial uses:
- 1 EMR
on-prem-clusterinus-west-1.- 1 master * r4.4xlarge on demand instance (16 vCPU & 122GiB Mem)
- 3 workers * r4.4xlarge spot instances (16 vCPU & 122GiB Mem)
- 1 EMR
alluxio-compute-clusterinus-east-1.- 1 master * r4.4xlarge on demand instance (16 vCPU & 122GiB Mem)
- 3 workers * r5d.4xlarge spot instances (16 vCPU & 128GiB Mem & 600GiB NVMe)
Launching Clusters using Terraform
For this tutorial, you will use Terraform to execute the following:
- Network. Create two VPCs in different regions, and enable VPC peering to connect them.
- EMR. Spin up two EMR clusters.
- Prepare Data. Mount TPC-DS dataset in the on-premise proxy cluster to be accessed by the compute cluster.
Create clusters by running the commands locally. First, download the Terraform example. We provide examples for different authentication types.
If you plan to access the web UI, create a file terraform.tfvars to override the defaults before
running terraform apply.
Execute the following to set the variable local_ip_as_cidr to your public IP.
This allows traffic from your IP address to the web UI at port 19999.
echo "local_ip_as_cidr = \"$(curl ifconfig.me)/32\"" >> terraform.tfvars
The downloaded example consists of 3 tf files:
variables.tfdefines the possible inputs for the example. Create or append the fileterraform.tfvarsto set variable values. For instance, you can choose to deploy EMR v6 (Hadoop 3) instead of the default EMR v5 (Hadoop 2) as the on-prem proxy.$ echo 'on_prem_release_label = "emr-6.0.0"' >> terraform.tfvarsFor a description of all available variables, please read
variables.tf
Initialize the Terraform working directory to download the necessary plugins to execute. You only need to run this once for the working directory.
$ terraform init
Create the networking resources and launch the two EMR clusters.
$ terraform apply
Type yes to confirm resource creation.
This final command will take about 12 minutes to provision the cluster, including creation of other AWS resources such as a VPC network with peering.
This step may take longer based on the provisioning status for spot instances.
After the clusters are launched, the public DNS names of the on-prem cluster master and compute cluster master will be displayed on the console.
Apply complete! Resources: 40 added, 0 changed, 0 destroyed.

Outputs:

alluxio_compute_master_public_dns = ec2-1-1-1.compute-1.amazonaws.com
on_prem_master_public_dns = ec2-2-2-2.us-west-1.compute.amazonaws.com
Keep the terminal to destroy resources once done with the tutorial.
Access the Clusters
SSH Access. EMR clusters, by default, will use your OpenSSH public key stored at
~/.ssh/id_rsa.pub to generate temporary
AWS key pairs to allow SSH
access.
Replace the dns names with their values shown as the result of terraform apply.
- SSH into the on-prem cluster.
$ ssh hadoop@${on_prem_master_public_dns} - SSH into the Alluxio compute cluster
$ ssh hadoop@${alluxio_compute_master_public_dns}
For simplicity, we will use the SSH commands without giving private key path in this tutorial.
Indicate the path to your private key or key pair pem file if not using the default private key path
at ~/.ssh/id_rsa.
$ ssh -i ${private_key_path} hadoop@${on_prem_master_public_dns}
$ ssh -i ${private_key_path} hadoop@${alluxio_compute_master_public_dns}
Web Access. The Alluxio Web UI can
be accessed on the default port 19999 on the compute cluster.
The Web UI has a tab called
Managerwhich can be used to check connectivity between the compute cluster to the cluster on-premises.
SSH in to the compute master and type alluxio fs mount to get the HDFS path and options to use
with the HDFS Validation tool in the Manager UI.
Note: The mount options should be delimited by a space.
SSH in to the compute master and type alluxio fs mount to get the HDFS path and options to use
with the HDFS Metrics tool in the Manager UI.
Note: The mount options should be delimited by a space.
SSH in to the compute master and look at /etc/presto/conf/catalog/onprem.properties to get the
options to use with the Hive Metastore Validation tool in the Manager UI.
Note: Replace
_HOSTwith the internal hostname for the compute master.
Prepare Data
If you wish to evaluate the setup, copy a dataset to the on-premise cluster and run queries from the compute cluster.
Here’s a summary of what’s to come:
- Load the TPC-DS dataset into HDFS and create table definitions in Hive on the on-premise proxy cluster.
- Run queries from the burst compute cluster to measure execution performance with Alluxio.
- Running the query for the first time will access HDFS in the
on-prem-cluster. - Running the query for the second time will access data from Alluxio, since the data is cached from the first run, resulting in a faster query.
- Running the query for the first time will access HDFS in the
Changes to the cluster on-premises, such as updating tables in Hive, will seamlessly propagate to Alluxio without any user intervention. After executing the benchmarks, you will also learn about Alluxio’s metadata synchronization capabilities setup using Active Sync.
SSH into the Hadoop cluster on-prem-cluster to prepare TPC-DS data for query execution.
$ ssh hadoop@${on_prem_master_public_dns}
Once you’ve logged into the cluster, copy data from Alluxio’s public S3 bucket.
on-prem-cluster$ hdfs dfs -mkdir /tmp/tpcds/
on-prem-cluster$ s3-dist-cp --src s3a://autobots-tpcds-pregenerated-data/spark/unpart_sf100_10k/store_sales/ --dest hdfs:///tmp/tpcds/store_sales/
on-prem-cluster$ s3-dist-cp --src s3a://autobots-tpcds-pregenerated-data/spark/unpart_sf100_10k/item/ --dest hdfs:///tmp/tpcds/item/
This step takes about 3 minutes with the default configuration.
Once data is copied into HDFS, create the table metadata in Hive.
on-prem-cluster$ wget https://alluxio-public.s3.amazonaws.com/hybrid-quickstart/create-table.sql
on-prem-cluster$ hive -f create-table.sql
Keep the SSH session open as you will re-use the same session later.
Run Applications
Run a Query. You may choose to run different applications on AWS EMR to leverage Alluxio.
To continue to benchmark with TPC-DS data, Presto has been pre-configured in your setup.
A Presto catalog named onprem is configured to connect to Hive metastore and HDFS in
on-prem-cluster accessing data via Alluxio without any table redefinitions.
Only the first access reaches out to the remote HDFS and all subsequent accesses are serviced from
Alluxio.
SSH into the compute cluster alluxio-compute-cluster to execute compute queries.
$ ssh hadoop@${alluxio_compute_master_public_dns}
Transparent URI has been setup for Presto on the compute cluster to allow accessing Hive tables from the on-prem cluster without redefinitions. You can review the configuration.
alluxio-compute-cluster$ cat /etc/presto/conf/catalog/onprem.properties | grep hive.config.resources
alluxio-compute-cluster$ cat /etc/presto/conf/alluxioConf/core-site.xml | grep "alluxio.hadoop.ShimFileSystem" -A5 -B2
Download the sample query.
alluxio-compute-cluster$ wget https://alluxio-public.s3.amazonaws.com/hybrid-quickstart/q44.sql
Execute the query using Presto.
Run the query twice. The second run should be faster since data is cached in Alluxio.
Metadata Synchronization. One of the challenges in accessing data on-premises from a public cloud is that updates on either end should become available for the other end without manual intervention. With Alluxio, data ingestion pipelines for the on-premise datacenter do not need to change in order to enable access in a public cloud. Alluxio seamlessly reflects any updates between the two clusters. To check the paths configured to use Active Sync, run:
alluxio-compute-cluster$ alluxio fs getSyncPathList
Execute a query from the zero-copy burst cluster alluxio-compute-cluster before updating Hive and HDFS
on-premises.
Note that a student named fred has age
32, while barney has age35.
Update the Hive table to swap the age of the two students.
Execute the following on the cluster on-prem-cluster:
on-prem-cluster$ hive -e "insert overwrite table students values ('fred flintstone', 35), ('barney rubble', 32);"
Run the select query on on-prem-cluster to see that the change is reflected locally.
on-prem-cluster$ hive -e "select * from students;"
Run the same query again on alluxio-compute-cluster to see that the change is reflected when accessed via
Alluxio.
Note that you may experience a lag for the changes to be reflected in Alluxio. By default, Alluxio synchronizes metadata in 30s intervals. This is configurable and synchronization can be on-demand depending on the use case.
You can repeat this exercise to see that Alluxio invalidates any cached data which has been updated on-premises and retrieves the data on a subsequent access.
Cleaning up
When done, on the same terminal used to create the AWS resources, run terraform destroy to tear
down the previously created AWS resources.
Type yes to approve.
Congratulations, you’re done!